What is Sales Invoice?
What is Sales Invoice? How to create an Invoice without a Sales Order? In the business world, most of the Invoices or Billing happens as the Customer purchases or buys items (A walk-in customer). It is a cash payment and Credit Receipt process. This is called Direct Invoice Inventory as it is for the items that are sold over the counter (OTC).
However in Business, it happens where the Buyer will call the Seller offering a price to buy items NOW and he will not send a Purchase Order. Seller will Create an Invoice and send materials directly. This Order is called “Over the Phone” and no Sales Orders are made for this as its a confirmed order to deliver.
In ACTouch ERP, we can also create an Invoice without any Sales Order references. This is called “Direct Invoice Inventory”. Here also you can make 2 types of Invoices.
- Direct Invoice Inventory
- Direct Invoice Services
Video – How to create a Direct Invoice – Inventory?
The Direct Invoice Inventory data entry is same as that of Sales Order Menu. However there are few points to note.
As per the statutory rules, Invoice is a Financial document thats considered for the Confirmation of Sales, Taxes to Collect and customer is liable to PAY the money. It also acts like Stocks or Services is Received by a CUSTOMER and he is agreed to pay the money as per this Invoice.
When you create a Sales Invoice – Inventory, the below activities happens and these are very important to understand.
- Sold Items reduces from Inventory / Location where the stock is maintained.
- It creates a Liability towards the Customer to PAY MONEY.
- It creates an Entry towards TAXes and how much TAX to collect from customer and pay Govt.
- It updates the company Balance Sheet, Profit and Loss Data automatically.
Note: ACTouch ERP doesn’t allow you to sell the Items, if the stock is ZERO. Means, we do not allow -ve stock sales. So you need to have stock / Inventory to complete the sales.
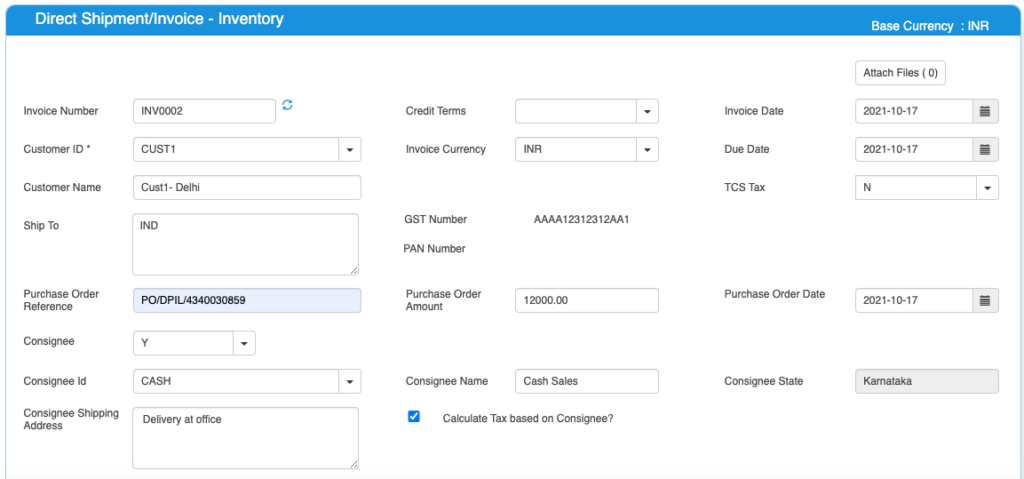
Direct Invoice Inventory – Home page has few data that we need enter.
The details are as below.
| Field ID | Field Name | Mandatory? | Field Description and how it helps? |
|---|---|---|---|
| Site ID | Branch Name | No | If you are using Multiple Branches feature then this FIELD appears. Multi Branch / Sites is a feature that can help to make separate document for each SITE / Branches. |
| Invoice Number | Invoice No | Yes | This is the Invoice number, a unique number to recognise the document. This is either auto generatedManually you can create. |
| Credit terms | Credit Period | No | Select the Credit terms from the Dropdown. |
| INVOICE Date | INVOICE creation Date | Yes | Effective Date of transaction |
| INVOICE Currency | Currency of Document | Yes | It is the currency used for INVOICE Document / for Transaction. This is also called “Document Currency”. |
| Due Date | Payment due date | Yes | This is the date by which the payment has to be made. |
| Customer ID | Customer ID | Yes | It is a unique identification number given to each Customer in ACTouch ERP |
| Customer Name | Customer / Party Name | Yes | Customer Name / Business name. |
| Ship To | Shipping Address | Yes | This is the address of the customer where the particular product has to be delivered to. |
| GST Number / TAX ID | Customer Tax ID | No | This gives Customer TAX NO. It’s a unique ID necessary for businesses. |
| PAN Number | Permanent Account Number | No | This is the Permanent Account Number of the individual / Business. |
| TCS Tax | Tax Collected at Source Amount | Default value = N | Enable the feature, if you need it. This is the tax payable by a seller, which he collects from the buyer at the time of sale. |
| Purchase Order reference | Purchase/sales order number | No | This is Customer’s Order Number (for reference) |
| Purchase Order Amount | Purchase order amount | No | This is the total amount of the Customer Order (for reference) |
| Purchase Order Date | Purchase order date | No | This is the Customer Order Date (for reference) |
Product / Items line details are entered as below. If you update the PRODUCT master with TAXES, HSN Code, Bar Code etc, the data would appear immediately as you CHOOSE a PRODUCT.
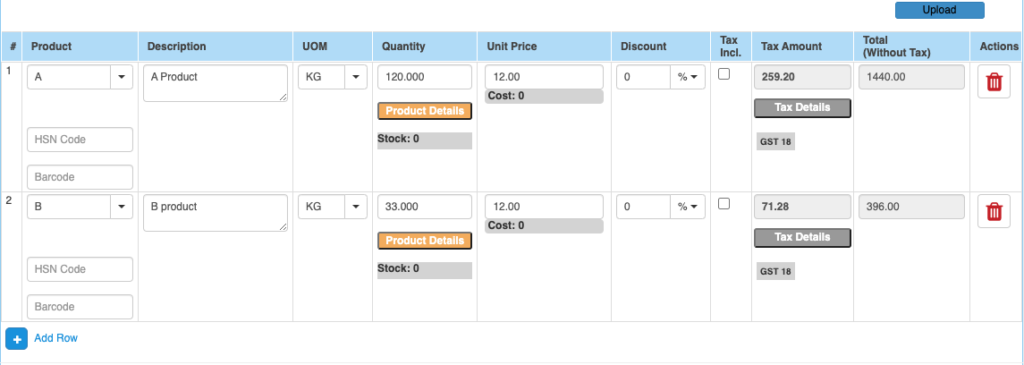
Field Details are explained here.
| Field ID | Field Name | Mandatory? | Field Description and how it helps? |
|---|---|---|---|
| Product Group, Subgroup1, Subgroup2, Subgroup3. | Product Group, Subgroup1, Subgroup2, Subgroup3 drop down values. | NO | These are the data helps to select the right PRODUCT for the line item. These data appears on the screen, if you enable “Product Group = Yes” in the “Sales Settings”. |
| Product ID | Product ID | Yes | Select Product ID for Sales. |
| Product Description | Product Description | Yes | It is the description about the product. |
| UOM | Unit Of Measure | Yes | Unit of Measurement of the Product. If you have an Alternate UOM, then select the same here for the Product that you are selling. |
| Quantity | Quantity Measure | Yes | This is the Selling quantity |
| Unit Price | Unit Price | Yes | It is the Unit price of the product. |
| Discount | Discount on LINE level | No | Apply the PRODUCT level DISCOUNT for the Customer, if any. |
| Tax incl. | Inclusive of Tax | Default = No | Tax include – Yes or No. This feature is used for the MRP types of Products where the TAX is ADDED with UNIT price. So we should show the Basic Product Amount + Taxes Separately. |
| Tax amount | Tax Amount | No | Please select the TAX CODES that are RIGHT for the PRODUCT. If you have setup these data in Product Master, then ERP will pick from there directly. |
| Total | Total Amount | Yes | This is the Total amount of the line item excluding TAX AMOUNT |
| HSN Code | HSN Codes | No | HSN Codes for the Product that are provided by Government. |
| Bar Codes | Bar code No | No | Bar codes helps to pick the items from master. |
Direct Invoice Inventory – This is the financial portion of the Invoice.
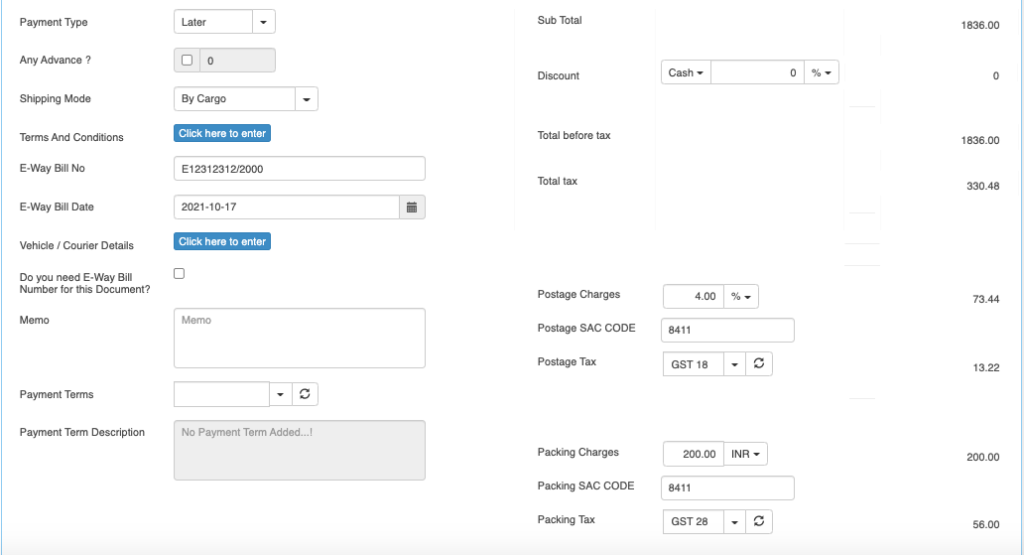
Direct Invoice Inventory – Financial details and its fields are explained below.
| Field ID | Field Name | Mandatory? | Field Description and how it helps? |
|---|---|---|---|
| Payment Type | Payment (Now or later) | By default – “LATER” | It describes whether the payment will be made immediately or at a later stage. Based on the same, a Financial Voucher is made. |
| Any Advance? | For the Advance Payment | No | In few cases, when you make a INVOICE, you can also receive the Advance money from Customer. ERP helps you to make an Advance Voucher as part of this. |
| Terms And Conditions | Business Terms And conditions | No | It’s the General Terms and Conditions for the Delivery etc. If you can also make templates and use it. |
| Ship Mode | Transport mode | No | This describes us about the type of transport for delivery. It may be by Air, Cargo, etc. |
| eWay Bill No | eWay Bill No | No | If you are shipping the items, then you can enter the eWay Bill no that’s generated by Indian Govt Portal. |
| eWay Bill Date | eWay bill Date | No | Date of the eWay Bill specific to Indian Govt |
| Memo | Additional information | No | You can add more Information about the Sales Order. |
| Payment terms | Payment terms | No | These give us the details about payment terms between the two Parties that they have agreed on. You can define multiple “Payment Terms” in Master and use them. |
| Payment Terms Description | Payment Terms | No | This is description of Payment terms. |
| Sub Total | Total price | Yes | Subtotal of the Order. |
| GROSS / Cash Discount | Discount on the total Payment | No | It’s the Overall discount on the Order. Two types Cash Discount – You can give the Discount in “Amount” only.Trade Discount – You can give either in “%age“ or in “AMOUNT” |
| Total before tax | Amount before tax | Yes | It’s the Total amount without Tax amount |
| Total tax | Tax amount | Yes | It’s the total Tax on the line items. |
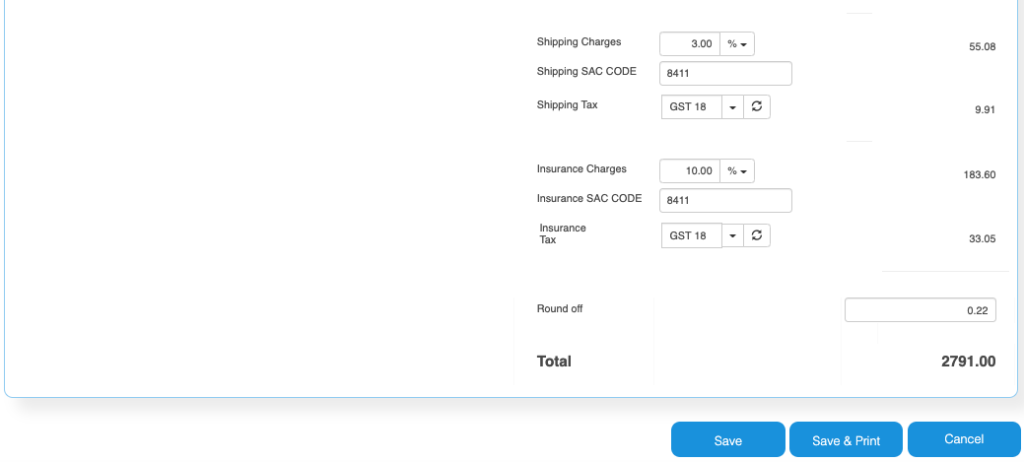
| Round off | Rounded off amount | No | Enter the Amount, if you want to change it. Its small amount that can be added or removed from the TOTAL AMOUNT to round-off. |
| Total | Total Amount of the Order | Yes | This is the total Order amount after rounding off. |
Additional Fields based on the “Sales Settings” on what additional charges to be booked.
| Field ID | Field Name | Mandatory? | Field Description and how it helps? |
|---|---|---|---|
| Postage Charges | Postage Amount, if any | No | Enter the Amount, if you need it. (Other charges for Order). Enter the Postage charges that will be billed to the Buyer, if any. |
| Postage SAC CODE | SAC Code | No | Enter the SAC Code, if you need it. |
| Postage Tax | Postage Tax | No | Select the Taxes, if you need it. This gives the tax levied for postage.it comes under different GST slabs for the type of product. |
| Packing Charges | Packing Charges, if any | No | Enter the Amount, if you need it. (Other charges for Order). This is the Charges for the product that’s billed to the buyer, if any |
| Packing SAC CODE | SAC CODE | No | Enter the SAC Code, if you need it. |
| Packing Tax | Tax for the Charges | No | Select the Taxes, if you need it. This gives the total TAX on transport cost of the product. |
| Shipping Charges | Shipping Charges, if any | No | Enter the Amount, if you need it. (Other charges for Order). This is the Shipping Charges for the product that’s billed to the buyer, if any |
| Shipping SAC CODE | Shipping SAC CODE | No | Enter the SAC Code, if you need it. |
| Shipping Tax | Tax for the Charges | No | Select the Taxes, if you need it. This gives the total TAX on transport cost of the product. |
| Insurance Charges | Insurance Amount, if any | No | Enter the Amount, if you need it. (Other charges for Order) Enter the Insurance amount for the product to be delivered, if any |
| Insurance SAC CODE | Insurance SAC CODE | No | Enter the SAC Code, if you need it. |
| Insurance Tax | Tax for the Charges | No | Select the Taxes, if you need it. This gives the total TAX on the freight insurance amount. |
If you set Consignee = “YES”, then the below screen OPENS and the details are explained below for Direct Invoice Inventory screen.

| Field ID | Field Name | Mandatory? | Field Description and how it helps? |
|---|---|---|---|
| Consignee | Consignee | By Default = NO | This is the Recipient of the Goods that are shipped. It tells whether we have a Consignee or not? |
| Consignee Id | Consignee ID | Yes | This is mandatory, if you enable “Consignee = Yes” This is the identification number given to a consignee. |
| Consignee Name | Name of the Consignee | Yes | Consignee Name / Business Name. |
| Consignee State | Consignee State | Yes | Consignee State and its important for Indian GST purpose. |
| Consignee Shipping Address | Shipping address of Consignee | Yes | Address of the shipment receiver (Consignee). |
| Calculate Tax based on Consignee | Tax on Consignee | By Default = NO | This tells whether to apply the tax on the Consignee or not. |
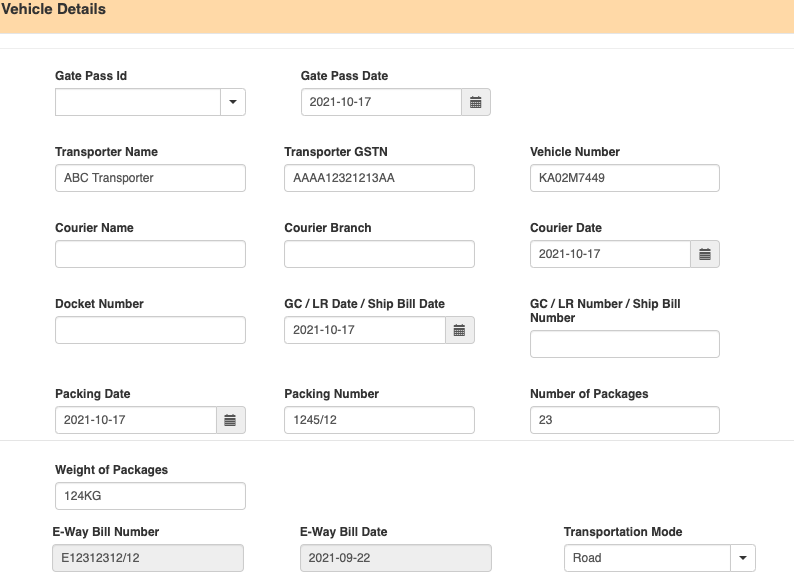
Enter Vehicle Details
Most of these data are entered for recording purpose. Few important parameters.
| Field ID | Field Name | Mandatory? | Field Description and how it helps? |
|---|---|---|---|
| Vehicle / Courier details | Vehicle /courier details | No | Enter Vehicle / Courier details like Transporter Name / Courier name, vehicle number, etc. |
| Gate pass Id | Gate Pass Voucher ID | No | This is the GATE Pass no that’s created in GATEPASS Module in ACTouch ERP. This helps to connect the GATE PASS Entry to the Invoice / GRN data. |
| Gate pass Date | Gate Pass Date | No | Date of Gate Pass entry in ERP |
| Transporter Name | Transporter Name | No | Transporter Name / person Name |
| Transporter GSTN | Transporter Tax ID | No | TAX NO. It’s a unique ID necessary for businesses. |
| Vehicle No. | Transporter Vehicle Number | No | Enter Transporter Vehicle Number. |
| Courier Name | Courier Agency Name | No | Courier Agency Name responsible for delivering the product to the customer or businesses. |
| Courier Branch | Courier Branch Name | No | Courier Agencies Branch |
| Courier Date | Date of product dispatch | No | Dispatch Date. |
| Docket Number | Doc No | No | Docket Number |
| GC / LR Date / Ship Bill Date | Receipt of the lorry | No | It is the Date of Receipt LR No etc that’s received from the transporter. |
| GC / LR Number / Ship Bill Number | Lorry receipt number | No | This gives the lorry receipt from the transporting company. |
| Packing Date | Date of package | No | Date the product was packaged. |
| Packing Number | Package number | No | Package no for reference. |
| Number of Packages | Total number of package | No | Total number of packages that’s delivered |
| Weight of Packages | Total weight of the packages | No | Total weight of the packages. |
Direct Invoice Inventory – Line level Product details Upload Feature.
As part of Create an Invoice, we also give an option to upload the product details at one go. We have customer, who use the same to upload around 500+ line items as part of Invoice Creation. This saves around 2 Hours to create an invoice with 500 lines at one go.
Few customers, who manage the Sales Orders with 100s of line items, it takes time to enter the data one by one. In few cases, it may be easy to create these data in Excel and upload them into ERP.
We built an interface for the Data upload that’s similar to an excel screen interface.
- You create the product line details with necessary fields.
- Paste the data on the Excel Interface
- Click on “Validate” and this process will ensure the Accuracy of Data.
- If you find any errors, then fix them.
- Once the data is OK, press “save”.
- Now application will start loading the records on the INVOICE LINE Level.
Notes: Don’t upload more than 40 records at a time. This takes around 1 to 2 min to load the data on the screen. So you can upload the data in multiple tranches